Skip to content
tinytip

Latest tips / 6

Run the same test with different data in Jest

March 15, 2022
#jest #testing
Credits: Matias Kinnunen

When you write a test in Jest and you want to run it with different data, you can use the test.each function. The function accepts a data table, which is an array of arrays with the arguments that are passed to the actual test function.

const table = [
["one", 1],
["two", 2],
["three", 3],
];

test.each(table)("converts %s to %d", (str, expected) => {
// Will be called 3 times with "one", "two", "three"
const result = convertToNumber(str);
expect(result).toBe(expected);
});

The title of the test can inject parameters with printf formatting (like %s for a string and %d for a number).

Read more about this in the Jest documentation.

Customize the PDF viewer when embedding a PDF

March 4, 2022
#html #pdf

If you want to embed a PDF document on your website you can use an iFrame. The browser will automatically render a PDF viewer.

Google Chrome, Firefox and Safari accept some parameters to customize the viewer. Add the parameters as part of the url fragment (after the #). Multiple parameters can be separated by &.

<iframe src="/path/to/document.pdf#toolbar=0"></iframe>

The following parameters are supported:

ParameterValueDescriptionSupport
toolbar1, 0Show or hide the toolbarChrome
viewFitV, FitH, FitChange the zoom level to fit (vertical, horizontal or both)Chrome
zoomnumberSet a specific zoom level in % (example: 300)Chrome, FF
pagenumberSet initial position to a specific page (example: 2)Chrome, FF, Safari
nameddeststringSet initial position to a named destination (like a heading)Chrome

How to get the event target inside Shadow DOM

March 3, 2022
#javascript #events #shadowdom

The event object in JavaScript has a target property which is the actual element that triggered the event. The currentTarget property is the element that the event listener is attached to.

<div id="container">
<button>Click Me</button>
</div>
document
.getElementById("container")
.addEventListener("click", (event) => {
console.log("target", event.target); // => button
console.log("currentTarget", event.currentTarget); // => div
});

This works different when using Shadow DOM. When the event was triggered inside an element with Shadow DOM, the target property points the Shadow DOM element, not the element that triggered the event:

<div id="container">
<!-- Web Component with Shadow DOM -->
<my-button>Click Me</my-button>
</div>
document
.getElementById("container")
.addEventListener("click", (event) => {
console.log("target", event.target); // => my-button
console.log("currentTarget", event.currentTarget); // => div
});

While this is good in terms of encapsulation, there are use cases where you need the actual target. In these cases you can use the composedPath method to get the actual target:

document
.getElementById("container")
.addEventListener("click", (event) => {
console.log("path", event.composedPath());
// => [slot, button, document-fragment, my-button,
// div#container, body, html, document, Window]
});

The method returns all the elements that are in the path of the event. The first element is the one that triggered the event.

Note: this works only if the Shadow DOM uses encapsulation mode open.
Use npm ci for a clean installation of your dependencies

March 2, 2022
#npm

You already now the npm install command, right? It installs your dependencies defined in your package.json and package-lock.json. It will reuse existing packages in your node_modules folder and may update the package-lock.json file to match the actual installed versions. This is fine for development, but it is not what you want on your build or testing server.

The npm ci command does a clean install of your dependencies. It removes the node_modules folder and re-installs the dependencies. It will make sure that the package-lock.json is up to date and will exit with an error if it is not. And will never update the package.json or package-lock.json.

# On your machine
npm install

# On your build or testing server
npm ci

See the npm documentation for more information.

Create clearer tests by nesting describe()

March 1, 2022
#testing #jest #jasmine

Testing Frameworks like Vitest, Jest and Jasmine provide a describe() function. It is useful to group your tests into logical groups. The function can be nested to create a hierarchy of tests and make the tests more readable.

In Angular for example, you will have the following spec file when creating a new component:

describe("AccordionComponent", () => {
it("should create", () => {
// ...
});
});

Instead of adding a lot of it() calls with long descriptions you can create multiple describe() blocks.

describe("AccordionComponent", () => {
describe("initial state is expanded", () => {
// Mock data, test utils, etc. for this describe() block
const initiallyExpanded = true;

it("should render the accordion title", () => {
// ...
});

it("should render the accordion content", () => {
// ...
});

it("should mark the accordion as expanded", () => {
// ...
});

it("should collapse the accordion when clicking on the title", () => {
// ...
});
});

describe("initial state is collapsed", () => {
it("should render the accordion title", () => {
// ...
});

it("should not render the accordion content", () => {
// ...
});

it("should mark the accordion as collapsed", () => {
// ...
});

it("should expand the accordion when clicking on the title", () => {
// ...
});
});
});

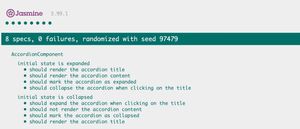
Jasmine shows all describe() blocks in the output and nests them in a tree structure.

Jasmine shows all nested describe blocks